
Table of Contents
We can run Spark applications in our dev machines either directly in IDE(e.g. IntelliJ) or by submitting the application via spark-submit shell script.
Spark requires Java runtime. Ensure that you have Java downloaded & configured in your machine. I have Java 1.8 configured in my machine. You can check Java version by running following command.
➜  ~ java -version
java version "1.8.0_60"
Java(TM) SE Runtime Environment (build 1.8.0_60-b27)
Java HotSpot(TM) 64-Bit Server VM (build 25.60-b23, mixed mode)
Configuring Spark in local
First download Spark binaries from here : download. Do not change any of the selected values & do not worry about hadoop binaries included in downloaded artifacts. You can very well run Spark applications in your local even if you do not have hadoop configured in your machine.
Since Spark framework is in active development mode & new releases are shipped very frequently, we will have to configure Spark in such a way that maintaining Spark across versions doesn’t require too many changes in paths, directory structure & environment variables.
Inside your user home directory(/home/
~ mkdir bin
~ cd bin
~ mkdir sparks
Next, unzip & copy the downloaded Spark binaries inside ~/bin/sparks/ directory. I have two versions of Spark downloaded in my machine. Running ls -ltr command returns the following:
➜  bin ls -ltr sparks
total 0
drwxr-xr-x@ 17 Users  578 Dec 10 00:59 spark-2.0.2-bin-hadoop2.7
drwxr-xr-x@ 17 Users  578 Dec 10 01:06 spark-2.0.0-bin-hadoop2.7
Next we will create a symbolic link that will point to the version of spark, we want to treat as default for our machine. Run the following command from inside bin directory:
~ ln -s sparks/spark-2.0.2-bin-hadoop2.7 spark
Running ls -ltr command should return the following:
drwxr-xr-x  4 136 Dec 10 00:58 sparks
lrwxr-xr-x  1 32 Dec 10 01:00 spark -> sparks/spark-2.0.0-bin-hadoop2.7
Next, lets configure Spark environment variable. Copy & paste the following lines in either of the files : .profile, .bashrc or .zshrc.
I am using zsh in my machine, so I had to update .zshrc file. If you are using bash shell then use .bashrc. Or better just create .profile file & add the lines there.
# SPARK Configuration
export SPARK_HOME=/Users/<username>/bin/spark
export PATH=$PATH:$SPARK_HOME/bin
Lets validate our installation process by starting spark-shell. If everything we have done till now is correct, then running sparks-shell command should start the Spark Shell.
➜  ~ spark-shell
17/01/24 09:43:05 WARN NativeCodeLoader: Unable to load native-hadoop library for your platform... using builtin-java classes where applicable
17/01/24 09:43:06 WARN SparkContext: Use an existing SparkContext, some configuration may not take effect.
Spark context Web UI available at http://127.0.0.1:4040
Spark context available as 'sc' (master = local[*], app id = local-1485272586191).
Spark session available as 'spark'.
Welcome to
      ____              __
     / __/__  ___ _____/ /__
    _\ \/ _ \/ _ `/ __/  '_/
   /___/ .__/\_,_/_/ /_/\_\   version 2.0.0
      /_/

Using Scala version 2.11.8 (Java HotSpot(TM) 64-Bit Server VM, Java 1.8.0_60)
Type in expressions to have them evaluated.
Type :help for more information.

scala> :q

~
One last thing before we move onto to IntelliJ configuration. We should change Spark’s default logging level to only log WARN messages instead of INFO. This prevents Spark from over-populating the console from log statements.
~ cd $SPARK_HOME/conf/
~ cp log4j.properties.template log4j.properties
~ nano log4j.properties
~ # Set everything to be logged to the console
log4j.rootCategory=WARN, console <<-- Change INFO to WARN
log4j.appender.console=org.apache.log4j.ConsoleAppender
~ close nano editor & save the file
Configuring IntelliJ
Download latest IntelliJ community edition from here : download. Once downloaded, start IntelliJ & install Scala plugin via IntelliJ IDEA -> Preferences -> Plugins -> Search for Scala. Install the latest version. This is all that is required for configuring IntelliJ. In the next section, I will implement sample SparkSQL program in IntelliJ & show you how to configure Spark specific dependencies & run your Spark program directly from IntelliJ.
SparkSQL Demo
Start IntelliJ and create new Scala project via File -> New Project -> Scala -> Enter SparkForDummies in project name field and click finish.
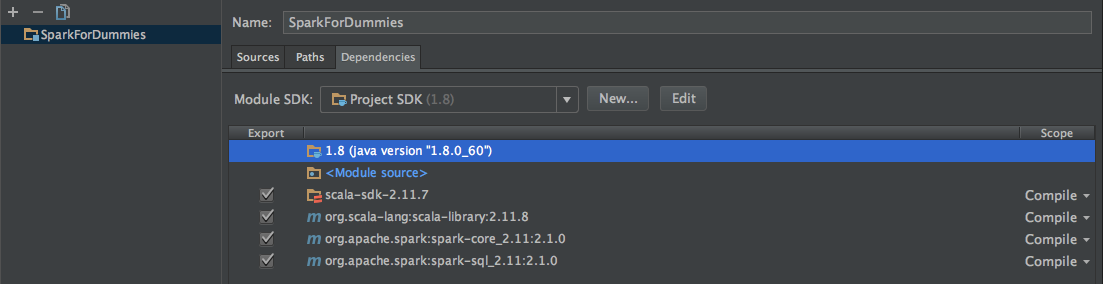
Before you click finish, ensure that project sdk is set to Java 1.8 & Scala sdk is set to 2.11.7
Next, lets add Spark dependencies. We will be adding following Spark dependencies to our project:
- org.scala-lang:scala-library:2.11.8
- org.apache.spark:spark-core_2.11:2.0.0
- org.apache.spark:spark-sql_2.11:2.0.0
Open up Project Structure window(File -> Project Structure) and add above mentioned dependencies by searching & adding them in Module -> dependencies tab. Screenshot below.
Setting Up Sample Data
We will be running a moderatly complex query against sample persons data. For the purpose of this blog, I have generated sample persons data(see below). Copy the data & save it in a file say Person_csv.csv. It’s a comma seperated file with first row being the header.
AddressCity,AddressLine1,AddressLine2,AddressState,AddressZIPCode,RecordNumber,FirstName,LastName,Email,PersonIndex,Gender,HomePhone,MaritalStatus,PersonID,SSN
Austin,dolore ea t,aliquyam consetetur,Texas,31244,937463544,First_Name_937463544,Last_Name_937463544,937463544@email.com,69,F,,Married,1,85374635
Boston,lorem,erat sit,California,23758,949524468,First_Name_949524468,Last_Name_949524468,949524468@email.com,90,M,,Unmarried,2,97244952
Houston,eirmod sanctus,ipsum at,Florida,22204-5052,929989712,First_Name_929989712,Last_Name_929989712,929989712@email.com,17,M,937463544,Unmarried,3,25523729
Washington DC,sit sadipscing,ipsum nonummy diam lo,New York,33171,913626428,First_Name_913626428,Last_Name_913626428,913626428@email.com,23,F,,Married,4,59884726
Los Angeles,dolore no dolo,takim,Florida,38763,993654848,First_Name_993654848,Last_Name_993654848,993654848@email.com,42,F,949524468,Married,5,47857472
New York,sed aliquam feugait,rebum kasd eleifend i,California,39731-6874,956498464,First_Name_956498464,Last_Name_956498464,956498464@email.com,77,M,,Unmarried,6,48942537
San Francisco,liber diam aliquyam eum,sanctus lo,Texas,21879-5208,967181567,First_Name_967181567,Last_Name_967181567,967181567@email.com,24,M,929989712,Married,7,84645646
Dallas,ipsum duis feugiat ea a,in clita kas,New York,82651s1648,921627686,First_Name_921627686,Last_Name_921627686,921627686@email.com,77,F,,Unmarried,8,18156752
Chicago,nonumy eum de,clita sit quod,New York,65416-8781,925348562,First_Name_925348562,Last_Name_925348562,925348562@email.com,36,F,913626428,Unmarried,9,21627686
Boston,ipsum er,facilisi,California,46278-6562,938252393,First_Name_938252393,Last_Name_938252393,938252393@email.com,79,M,,Married,10,68253485
Dallas,rebum gubergren in,veniam gubergren a,Texas,66292-3335,945282618,First_Name_945282618,Last_Name_945282618,945282618@email.com,85,M,993654848,Unmarried,11,55443825
Chicago,sadipscin,dolore,Florida,11415-7573,974572695,First_Name_974572695,Last_Name_974572695,974572695@email.com,57,F,,Married,12,23596245
Los Angeles,ipsum invidunt dolor e,vel justo erat,New York,82265,963332372,First_Name_963332372,Last_Name_963332372,963332372@email.com,70,F,956498464,Married,13,62552572
Houston,voluptua ipsum blandi,ipsum et,Florida,61831-7923,922735238,First_Name_922735238,Last_Name_922735238,922735238@email.com,69,M,967181567,Unmarried,14,14267728
Austin,eirmod accusam dia,at lorem lorem,California,08326-5637,979747416,First_Name_979747416,Last_Name_979747416,979747416@email.com,11,M,,Married,15,72843523
Washington DC,nonumy voluptua eir,at diam dolor eum vo,Texas,02063,968164326,First_Name_968164326,Last_Name_968164326,968164326@email.com,94,F,,Unmarried,16,52389497
San Francisco,dignissi,no magna sed,Texas,01597,957177767,First_Name_957177767,Last_Name_957177767,957177767@email.com,78,M,,Unmarried,17,74741646
New York,blandit ea et t,odio kasd accu,Florida,29253-6918,981289996,First_Name_981289996,Last_Name_981289996,981289996@email.com,82,F,,Married,18,68164326
New York,ipsum rebum invidunt,ut euismod d,California,61784-8146,937442725,First_Name_937442725,Last_Name_937442725,937442725@email.com,15,M,,Married,19,42571777
Dallas,doming jus,et no no sit aliq,New York,21272-7615,959874988,First_Name_959874988,Last_Name_959874988,959874988@email.com,53,F,921627686,Unmarried,20,72178128
SparkSQL Code
Back into our IntelliJ solution, under src directory, add a new Scala class called SparkSQLRunner. Before clicking ok change the kind dropdown value to Object. Object are like static classes in Java. Good for running stand alone code snippets. Once created, add main method inside the SparkSQLRunner class.
object SparkSqlRunner {
  def main(args: Array[String]) {
  }
}
For our SparkSQL code, we will be doing the following:
- SetUp SparkSession instance
- Use SparkSession instance to read saved Person_csv.csv file
- Reading csv file via SparkSession instance returns SparkSQL’s DataFrame instance
- Save the read data in temporary view
- Run SparkSQL against the temporary view
Copy-paste the code inside main method of SparkSQLRunner object & run the code directly from IntelliJ(Right click -> Run “SparkSQLRunner”). Assuming things have been configured correctly(Scala plugin & Spark dependencies), then the below code should run fine without throwing any error.
def main(args: Array[String]) {
    // setup SparkSession instance
    val spark = SparkSession
      .builder()
      .appName("SparkSQL For Csv")
      .master("local[*]")
      .getOrCreate()

    import spark.implicits._

    // Read csv file
    val df = spark.read.option("header","true").option("delimiter",",").csv("/path/to/file/Person_csv.csv")

    // Optional. Calling printSchema prints the inferred schema. See output below.
    df.printSchema()

    // Registers the DataFrame in form of view
    df.createOrReplaceTempView("person")

    // Actual SparkSQL query
    val sqlPersonDF = spark.sql(
      """
        |SELECT
        |              PersonID AS PersonKey,
        |                'XYZ' AS IdentifierName,
        |                PersonIndex AS Extension,
        |                'A' AS Status
        |              FROM person
        |              WHERE
        |                PersonID IS NOT NULL AND PersonIndex IS NOT NULL
        |              UNION
        |              SELECT
        |                PersonID AS PersonKey,
        |                'ABC' AS IdentifierName,
        |                RecordNumber AS Extension,
        |                'A' AS RecordStatus
        |              FROM person
        |              WHERE
        |                PersonID IS NOT NULL AND RecordNumber IS NOT NULL
        |              UNION
        |              SELECT
        |                PersonID AS PersonKey,
        |                'MNO' AS IdentifierName,
        |                SSN AS Extension,
        |                'A' AS RecordStatus
        |              FROM person
        |              WHERE
        |                PersonID IS NOT NULL AND SSN IS NOT NULL
      """.stripMargin)

      // Print the result. See output below
      sqlPersonDF.show(50)
  }
Output of calling printSchema(). As you can see, since the schema is inferred, all of the columns are of type nullable string. There are ways to explicitly specify the schema but thats another blog topic.
root
 |-- AddressCity: string (nullable = true)
 |-- AddressLine1: string (nullable = true)
 |-- AddressLine2: string (nullable = true)
 |-- AddressState: string (nullable = true)
 |-- AddressZIPCode: string (nullable = true)
 |-- RecordNumber: string (nullable = true)
 |-- FirstName: string (nullable = true)
 |-- LastName: string (nullable = true)
 |-- Email: string (nullable = true)
 |-- PersonIndex: string (nullable = true)
 |-- Gender: string (nullable = true)
 |-- HomePhone: string (nullable = true)
 |-- MaritalStatus: string (nullable = true)
 |-- PersonID: string (nullable = true)
 |-- SSN: string (nullable = true)
Sample output from calling sqlPersonDF.show().
+-------------+--------------+---------+------------+
|PersonKey|IdentifierName|Extension|RecordStatus|
+-------------+--------------+---------+------------+
|           17|           SSN| 74741646|           A|
|            7|          EMPI|       24|           A|
|           16|           SSN| 52389497|           A|
|            7|           SSN| 84645646|           A|
|            9|           MRN|925348562|           A|
.....
As you can see, its really easy to setup & run Spark applications in your local machine from your favourite IDE. But what if, you do not have source code & IDE available with you instead all you have is application jar file containing the SparkSQL code? This is where spark-submit script comes into picture.
spark-submit
In this section, I will quickly show you how to run your Spark application from console via spark-submit script instead of from IntelliJ.
spark-submit script is present under $SPARK_HOME/bin/ directory. Assuming you have configured the environment variable correctly, running the below command will show you all of the available scripts.
➜  ~ ls $SPARK_HOME/bin
beeline            load-spark-env.cmd pyspark            pyspark2.cmd       run-example.cmd    spark-class.cmd    spark-shell        spark-shell2.cmd   spark-submit       spark-submit2.cmd  sparkR.cmd
beeline.cmd        load-spark-env.sh  pyspark.cmd        run-example        spark-class        spark-class2.cmd   spark-shell.cmd    spark-sql          spark-submit.cmd   sparkR             sparkR2.cmd
Without going into too much details of command line options available for running spark-submit script, I will present the script required for running our application.
$SPARK_HOME/bin/spark-submit --class SparkSqlRunner SparkForDummies.jar "/path/of/file/Person_csv.csv"
The command is self explanatory. SparkForDummies.jar is the jar file containing class SparkSqlRunner which contains the executable code. Before we can run this command, we need to get two things done.
- Change code to read file path as command line argument instead of hard coding it. This is easy.
- Create the SparkForDummies.jar
Removing hard code file path is easy. Just replace the path with args(0).
// Read csv file
val df = spark.read.option("header","true").option("delimiter",",").csv(args(0))
Creating SparkForDummies.jar is easy too. From IntelliJ, click on File -> Project Structure -> Artifacts. Artifacts screen will be blank. Click on plus(+) sign and from the drop down select jar followed by option module with dependenicies. This will open up another pop-up window(screenshot below).
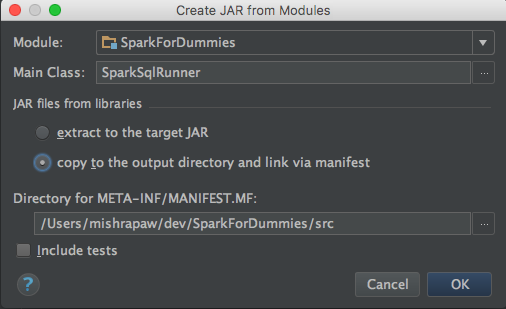
Ensure that you have selected SparkSQLRunner under main class section & selected the copy to the output directory & link to manifest option. Click ok. Save the changes & go ahead and build the solution. IntelliJ will build the solution & generate the SparkForDummies.jar file somewhere inside /out/artifacts/ directory. Next, navigate to the location where SparkForDummies.jar file is located & run the below command.
$SPARK_HOME/bin/spark-submit --class SparkSqlRunner SparkForDummies.jar "/path/of/file/Person_csv.csv"
Once again, assuming you have built & configured things correctly, the command will run fine & you will get similar output as shown before.
Intent of this blog post was to get started with Spark. There is so much more to Spark than what we have seen in this post. I am quiet confident that I will be spending more time exploring Spark framework & blogging about it in parallel.